Create Reusable Chatbot Templates For Your SaaS Business With Strapi
If you are a chatbot developer, selling the same service to multiple customers, you probably want to make as few changes as possible in your code for each new customer. If possible, you probably want to run the exact same code across all your customers, in order to make new deployments and maintenance as easy as possible. This is the basis of a scalable SaaS business: each new customer should cost only marginally more than the previous one, and adding new features or fixing bugs should benefit all customers at once.
In this article, I will show how to connect a custom CSML chatbot template with Strapi to make it very reusable, and allow you to create your own Chatbot as a Service business very easily!
The Target Customer
Let's say that your target customers are all your friendly neighbourhood hardware stores, to help them provide on-demand IKEA furniture assembly services via a simple chatbot. The goal of the chatbot is for the user to select what type of furniture they want to have assembled and receive a quote for the service.

The Chatbot
If you were to create a single-use chatbot for this use case (if you only had one single customer), the code would probably look like this:
start:
  say "Hi, welcome to Tony Stark Hardware!"
  say "We are open Mon-Fri, from 9AM to 6PM."
  say "Our address is: 200 Park Avenue, New York, NY 10166, USA"

services:
  say "Please select the type of furniture you would like us to assemble for you:"

  say Carousel(cards=[
  	Card("Tables", subtitle="I need help with assembling my table", buttons=[Button("Tables") as btnTable]),
  	Card("Chairs", subtitle="I need help with assembling my chair", buttons=[Button("Chairs") as btnChair]),
  	Card("Desks", subtitle="I need help with assembling my desk", buttons=[Button("Desks") as btnDesk]),
  ])

  hold

  if (event.match(btnTable)) {
    say "The cost for assembling a table is $25"
    remember selected = "table"
    goto end
  }
  else if (event.match(btnChair)) {
    say "The cost for assembling a chair is $18"
    remember selected = "chair"
    goto end
  }
  else if (event.match(btnDesk)) {
    say "The cost for assembling a desk is $34"
    remember selected = "desk"
    goto end
  }

  say "I did not understand!"
  goto services
Obviously, this example is oversimplified, but it should help us make our point. Now what happens if you get a second customer asking for the same type of chatbot, except they don't have the same name and address (obviously) and provide slightly different services (i.e they don't assemble desks, but they do assemble beds) at different prices? You could easily just copy/paste the code and make the required modifications, and again for the next customer, and the next one so on. But there is a better, more scalable way to do so!
The Backend
As you may have noticed, all of the services and informations about the shop could easily be saved into variables, for example:
start:
  do greetingsText = "Hi, welcome to Tony Stark Hardware!"
  do openingHours = "We are open Mon-Fri, from 9AM to 6PM."
  do address = "Our address is: 200 Park Avenue, New York, NY 10166, USA"

  say greetingsText
  say openingHours
  say address

  // etc. ...
What we would like to do is retrieve the value of the variables dynamically, based on the shop that this request is for. Ideally, we would like to have a backend that would be able to retrieve these values for us, something like:
do greetingsText = Fn("getGreetingsFromBackend")Enter Strapi, a fantastic open-source "headless CMS", which is a fancy word for "a customisable API solution that helps you manage and serve dynamic content". Luckily, CSML Studio already has a Strapi app, so integrating Strapi in our chatbot will be extremely easy!
To get started easily, I will simply install Strapi on my own machine locally, but there are plenty of other deployment options. For now, a simple npx create-strapi-app my-project --quickstart will nicely launch a ready-to-use Strapi instance, available on http://localhost:1337. Setup your admin user, and you're ready to go!
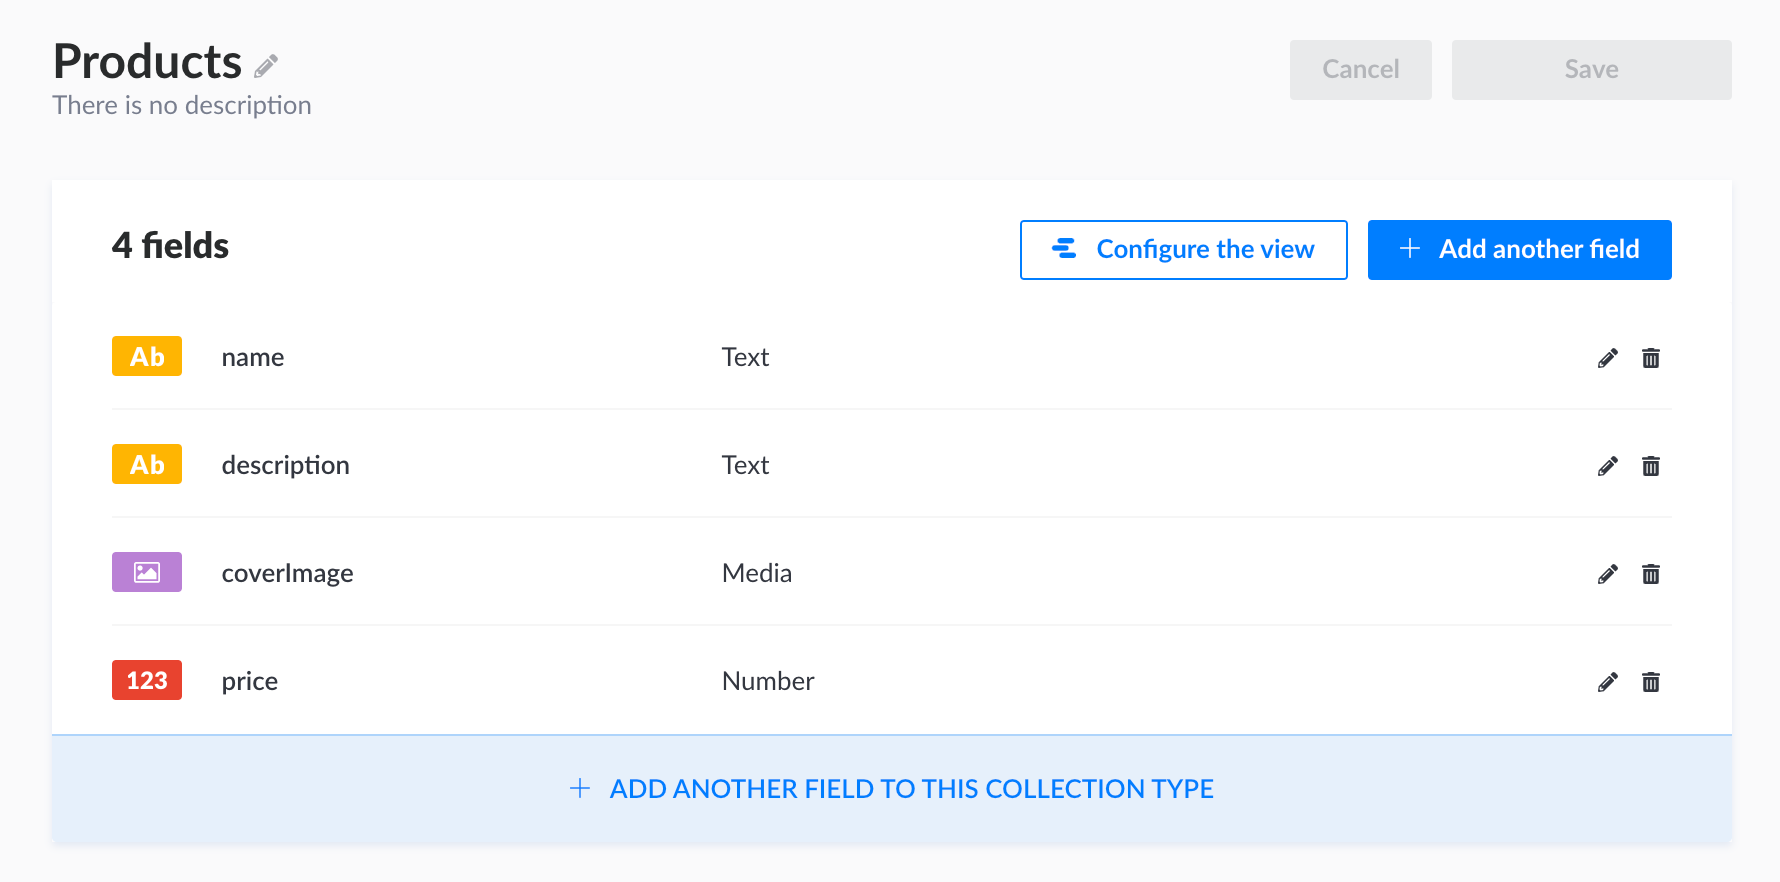
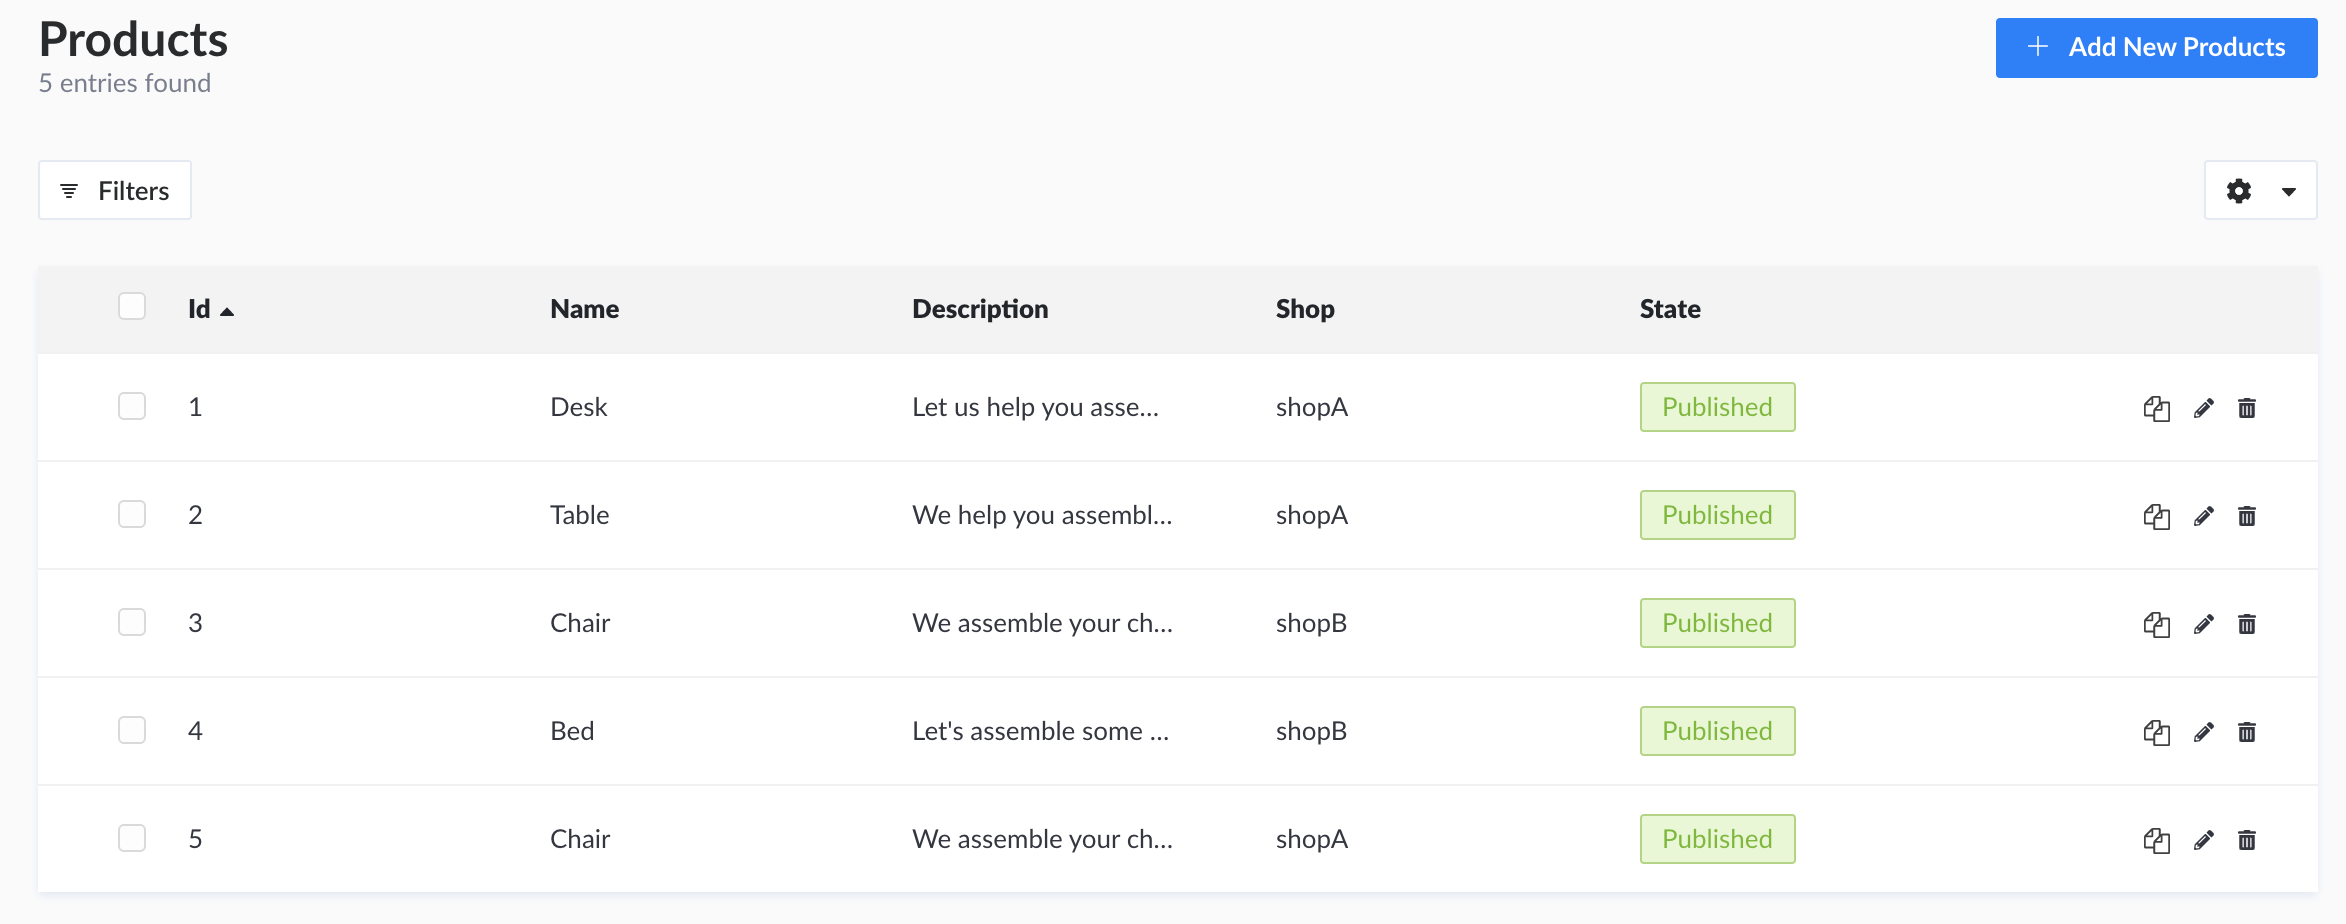
To manage your content, you will need to setup 2 different Content Types. One is for the products available at each of the shops, and evidently one is for each shop. Both must be collection types, as we will have multiple entries for each of them.
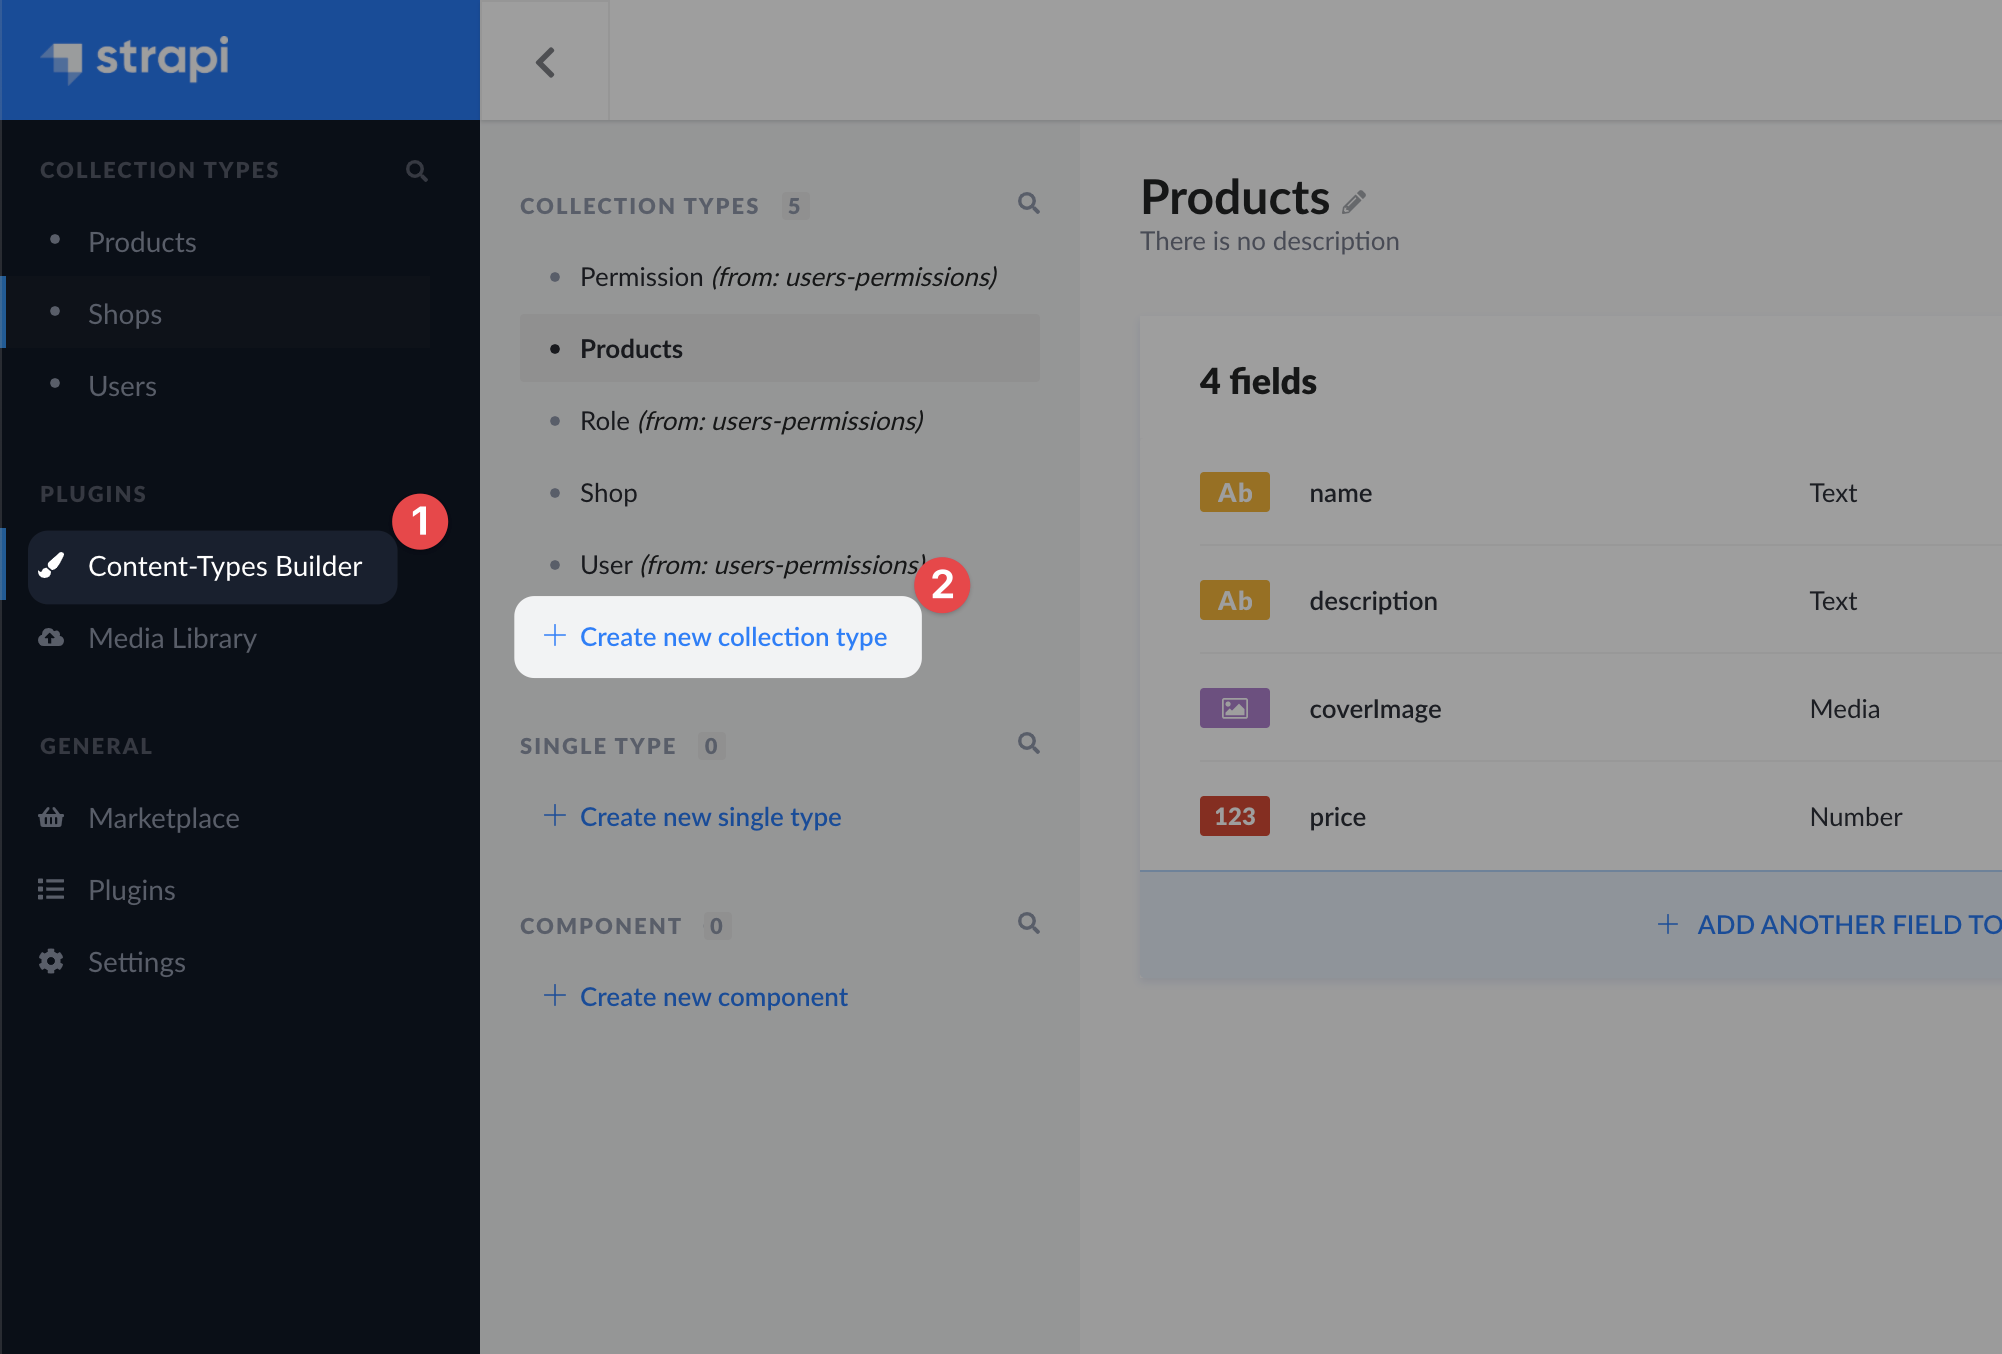
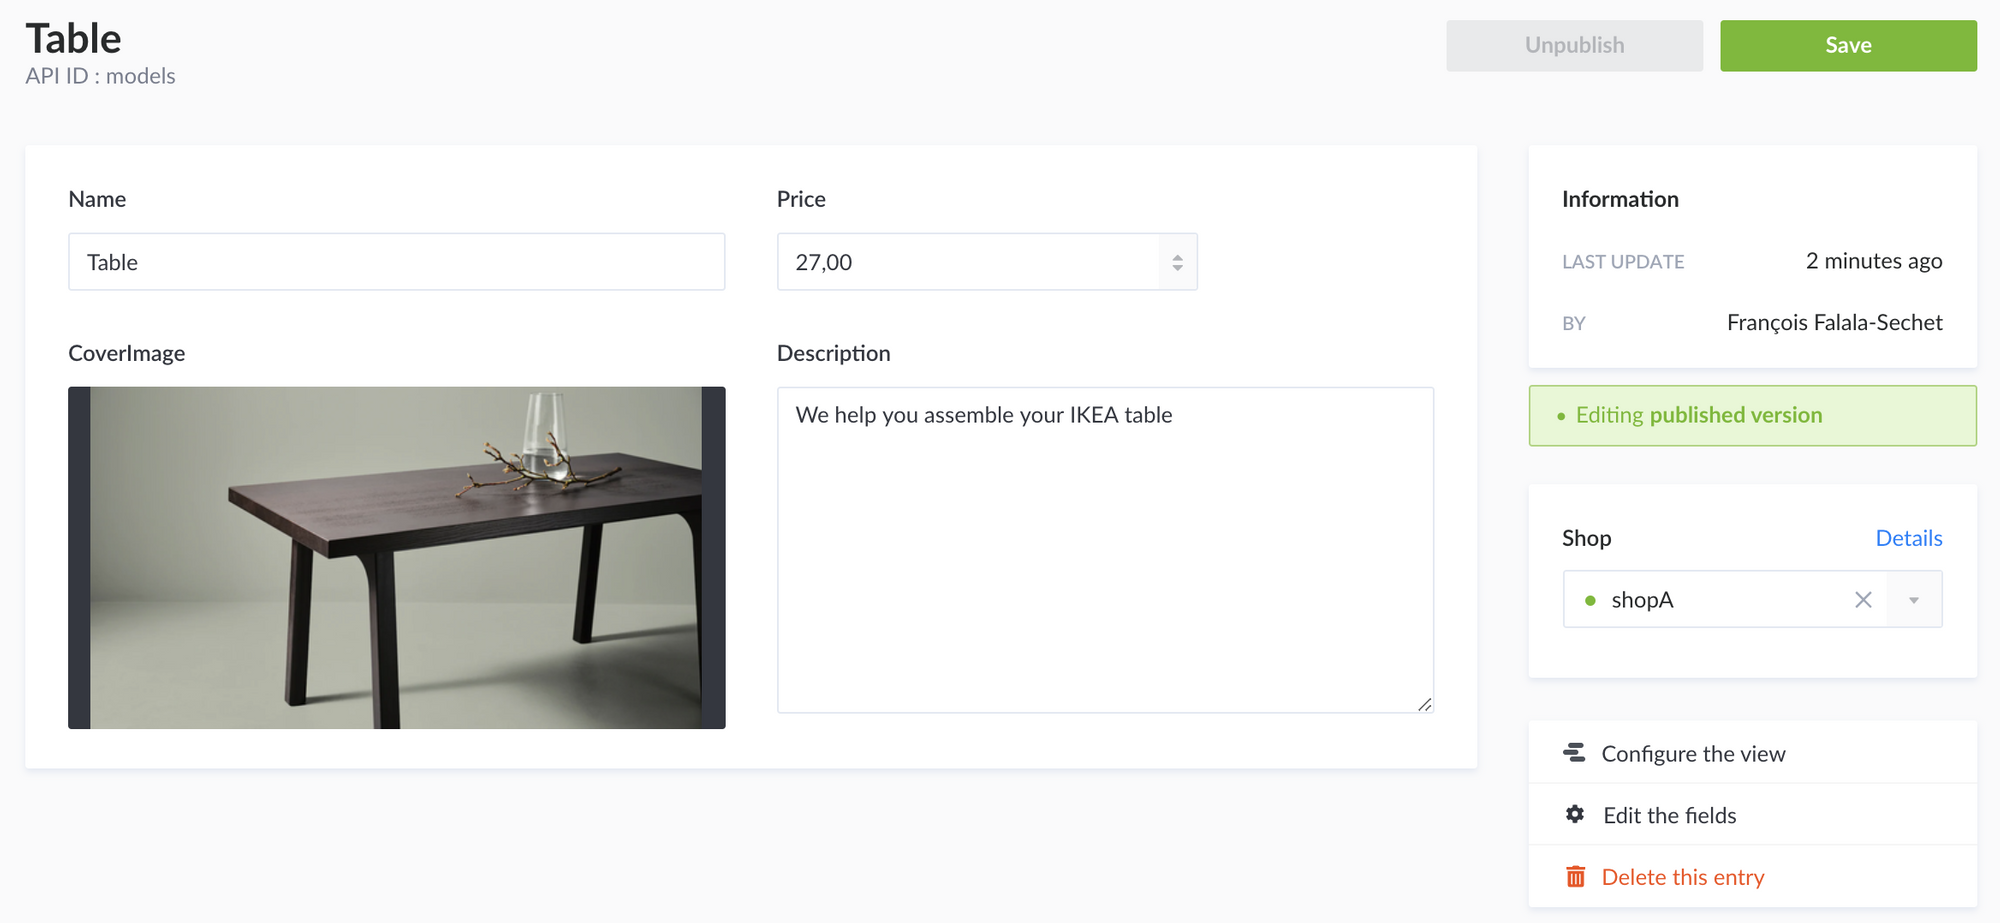
For the Products type, we will add a name, a description, a coverImage and a price, which should be self explanatory.
For the Shops type, we will need a few simple fields (name, openingHours, greetingText, address), but also two special fields: shopId, of UID type and a products field, a relation to the shop's products.
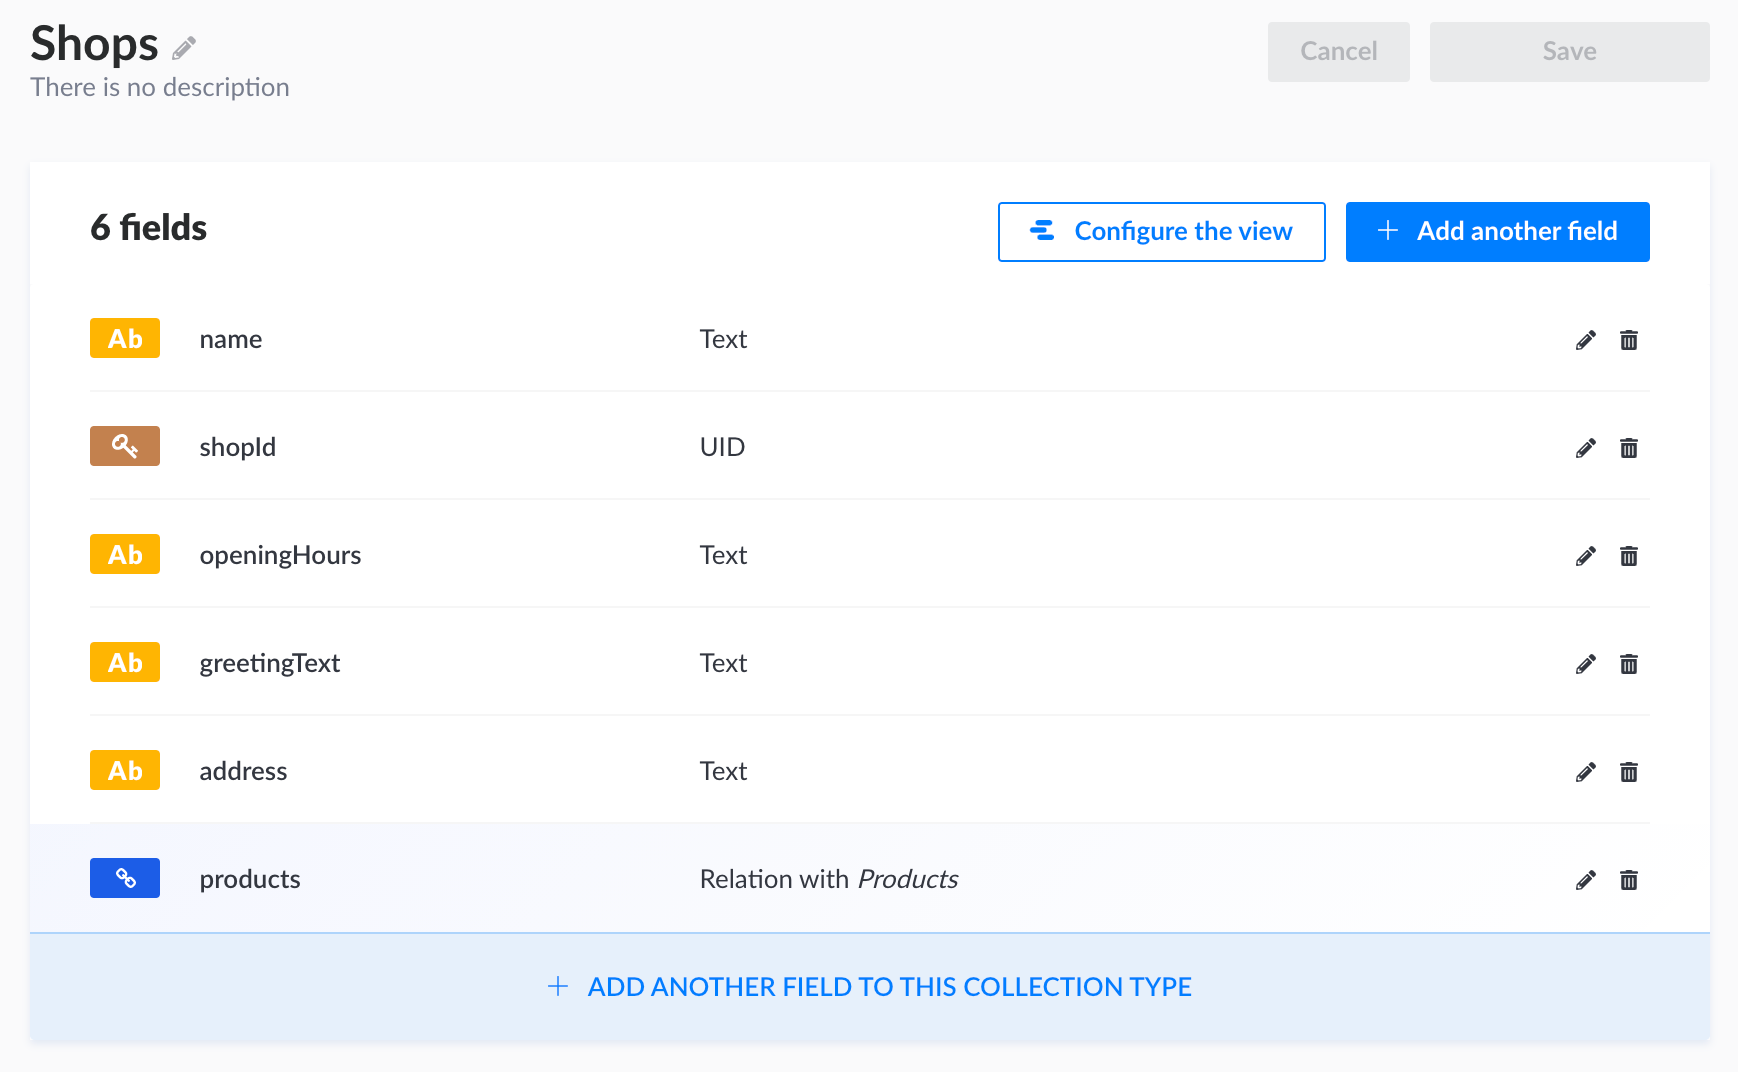
We will talk about the shopId field later, for now you only need to know that the UID type guarantees that the value must be unique across all entries. While two separate shops could have the same name (i.e Apple Store), they must have a very unique ID that sets them apart in the database.
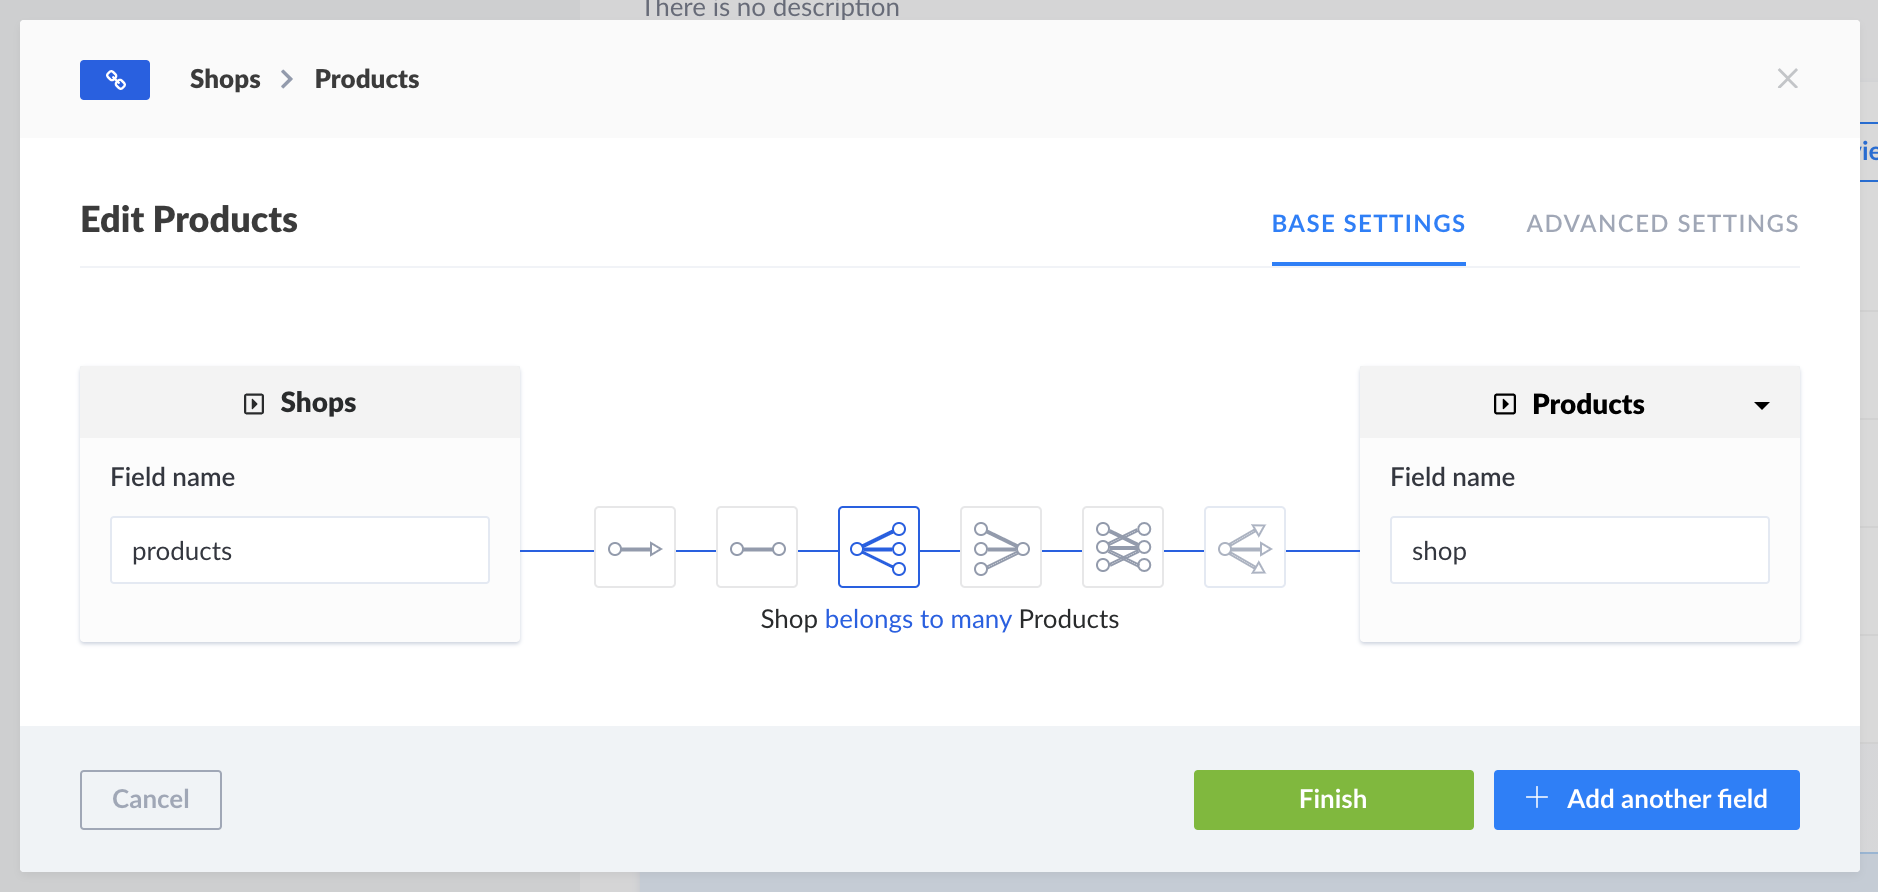
The products field is a relation field that tells the database which product belongs to which shop. When creating this field, make sure to use the "Shop belongs to many Products" relationship, as shown below:
Setting up the Content
Now that we are all set with our structure, let's create a few shops and products.
When creating the shops, remember to set a unique shopId value for each. It does not have to be a complicated value!
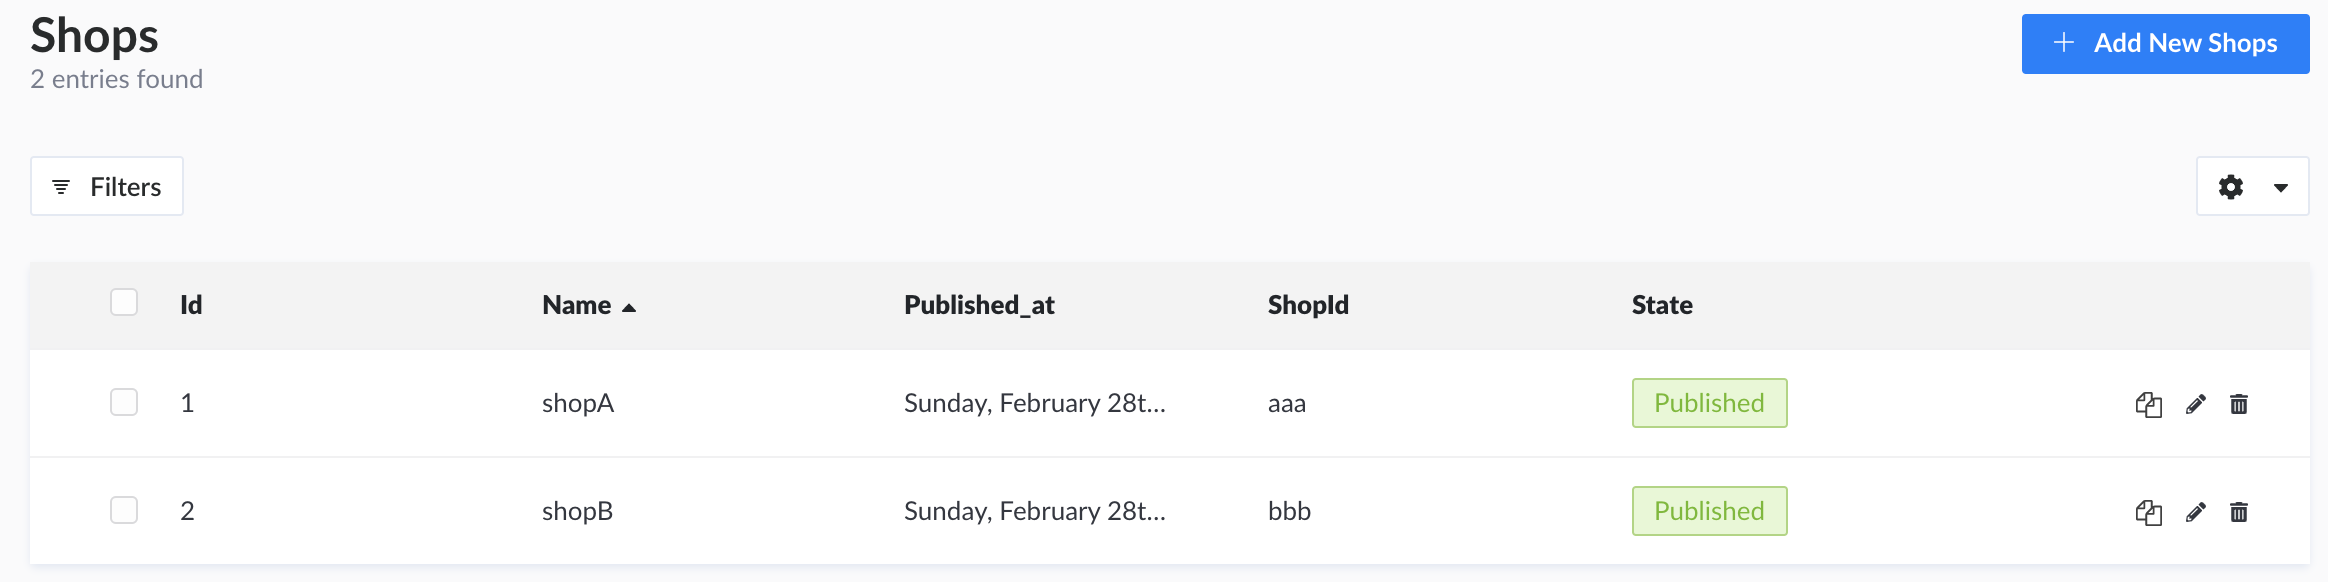
Here is an example for a sample shop called shopA, with shopId "aaa" (because why not, but you are free to pick a more unique and recognizable value!).
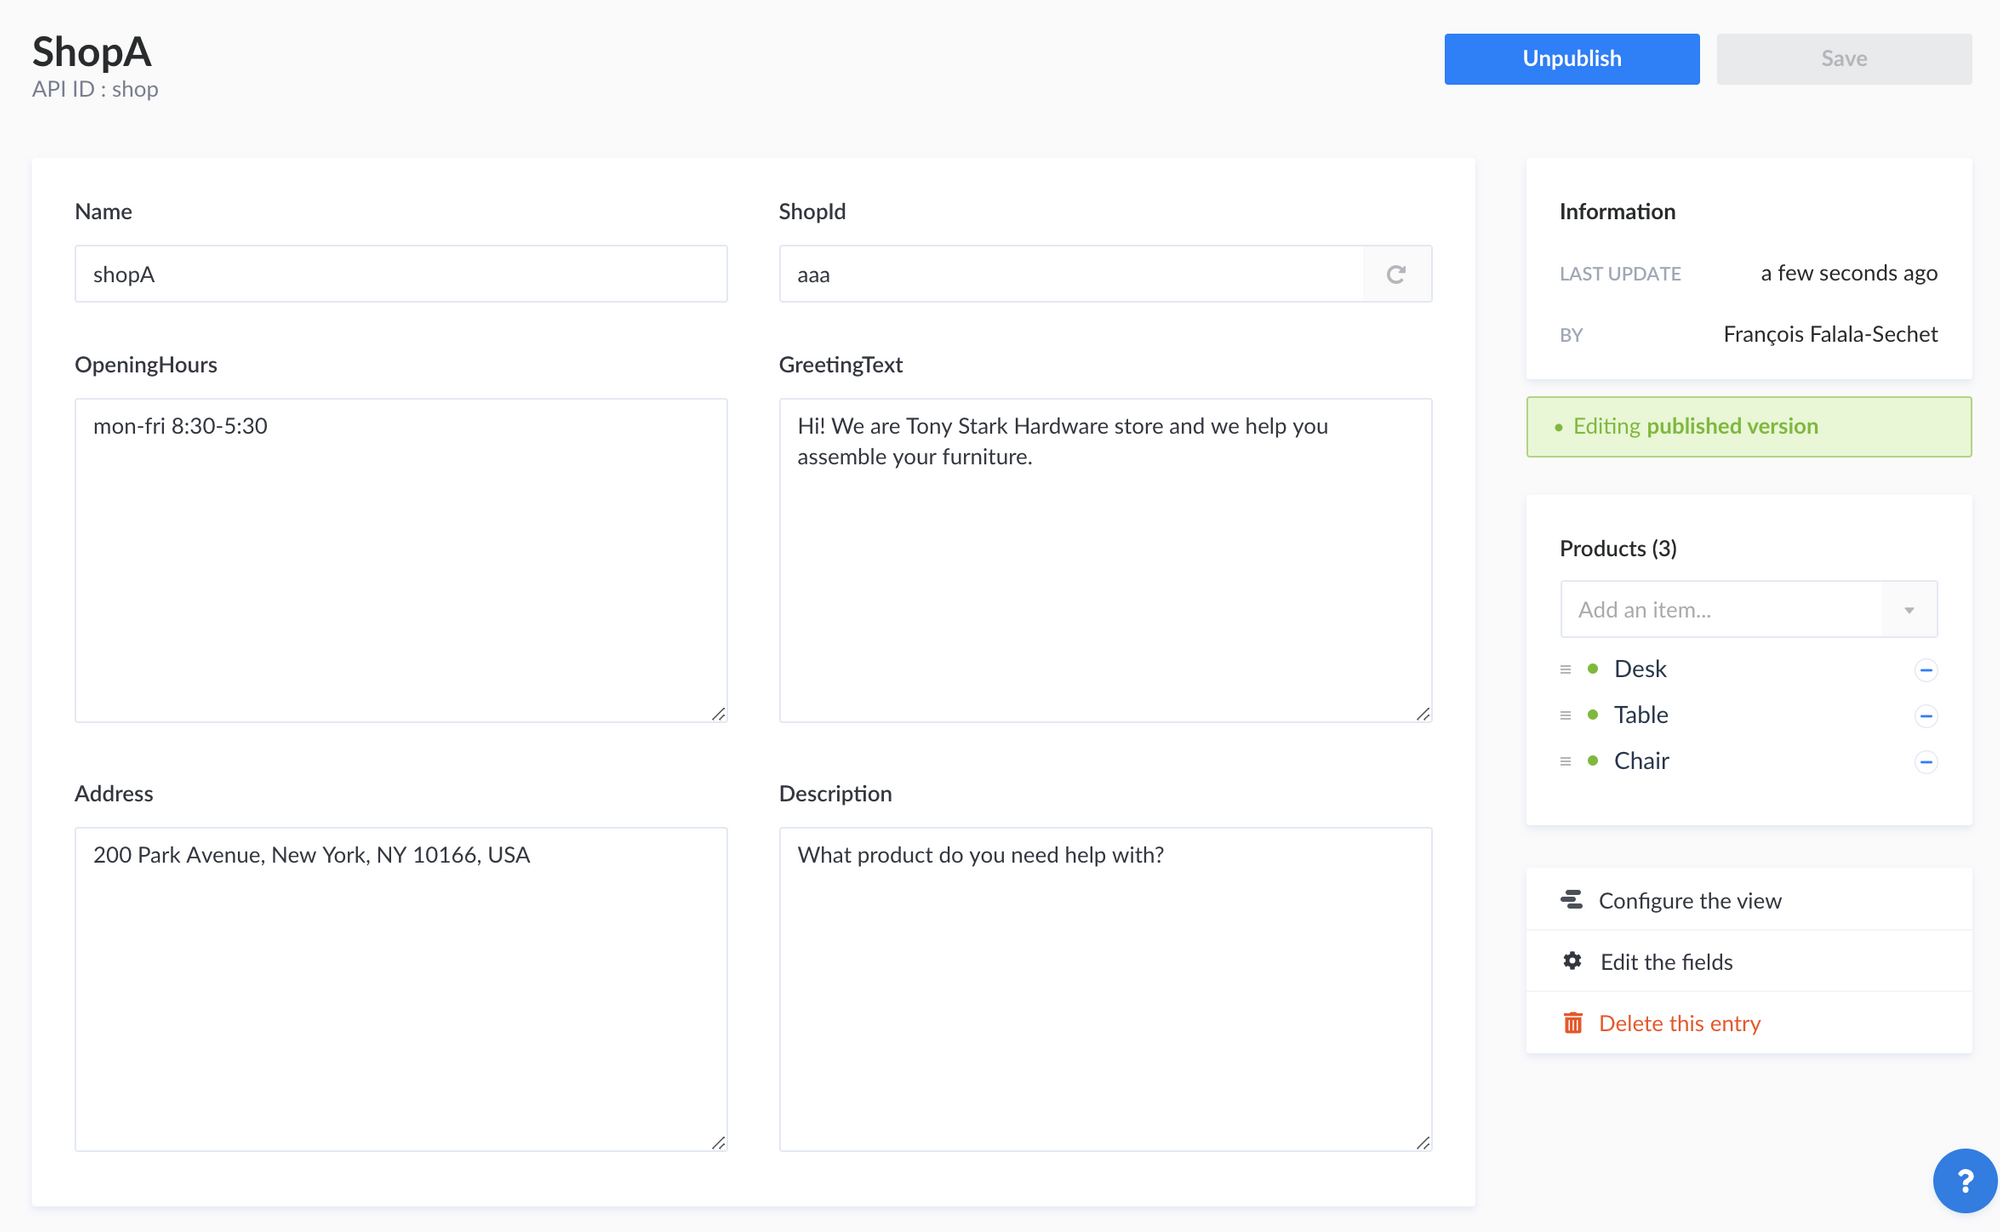
When setting up each product, remember to select which shop it belongs to! If 2 shops have a product with the same name, you should create it twice, as perhaps they want to use a different description or picture, or the price may be different. In our case, both shops are providing chair assembling services:
Here is an example product. Note that the Shop relationship panel on the right is set to shopA.
Connecting the Chatbot With Strapi
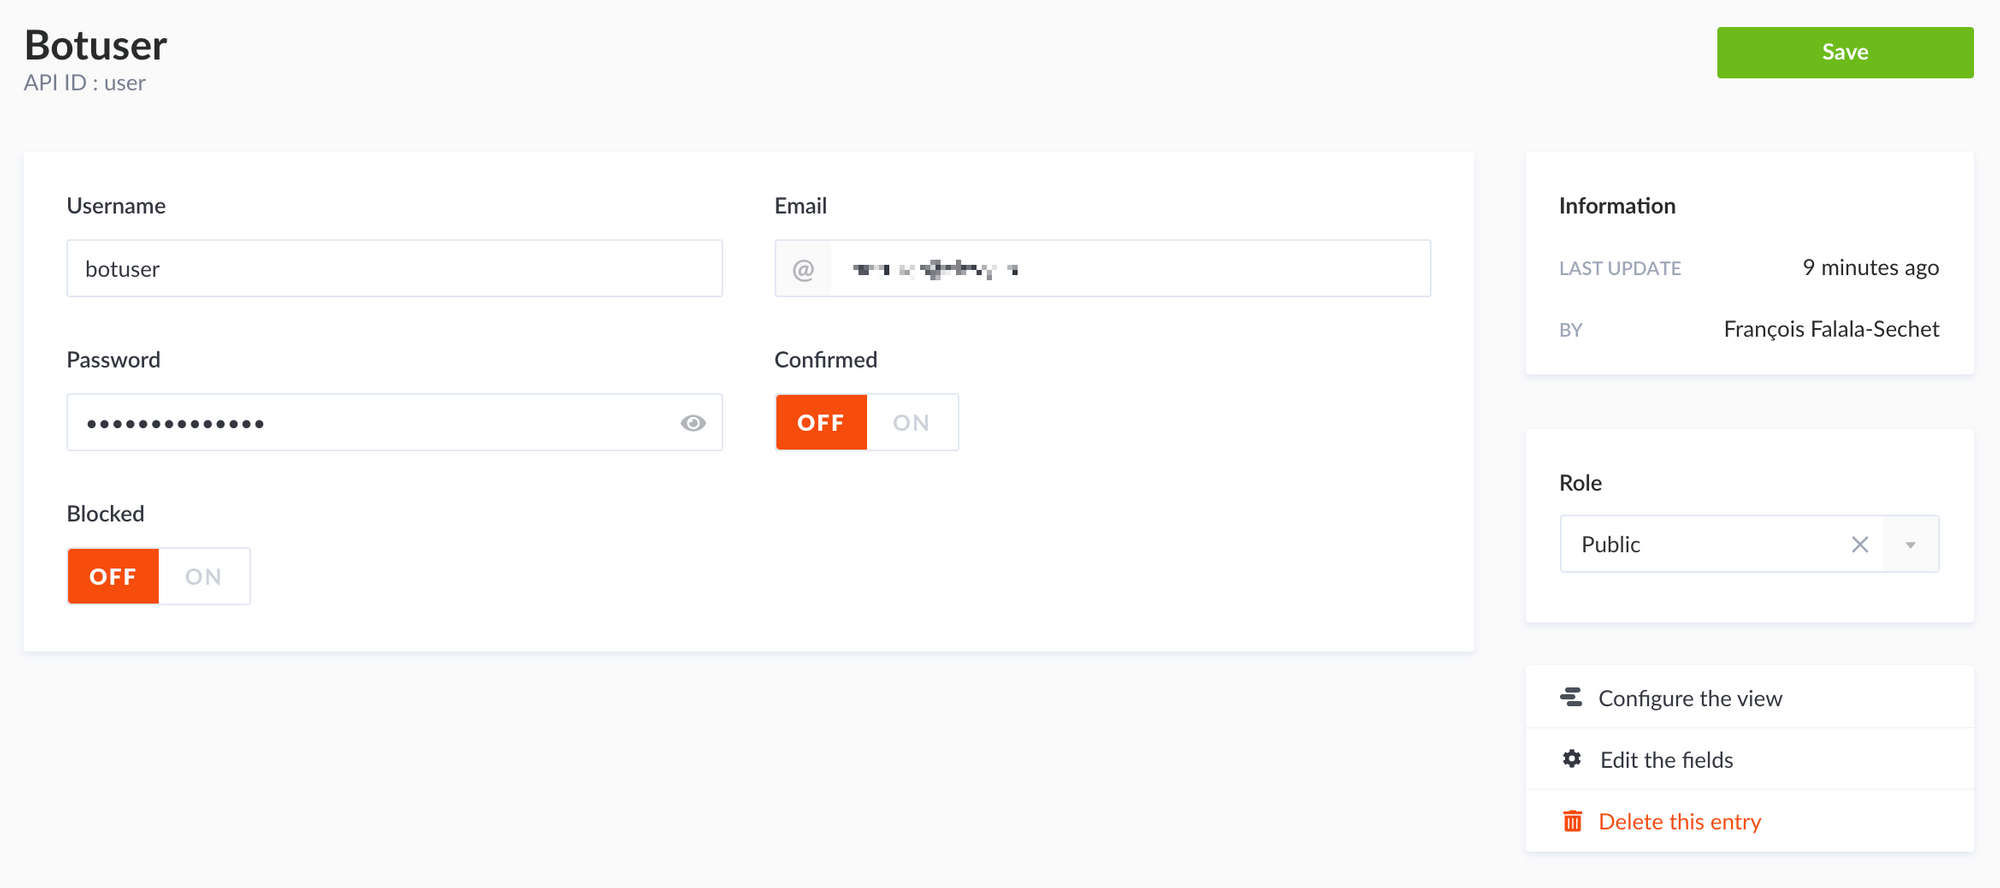
Now that we have our content ready, we still have a few more steps to do. Strapi being secured by default, no content is accessible unless an authenticated and authorized user is performing the request. Let's create a user first. Navigate to the Users collection type and create a new user with the Public role.
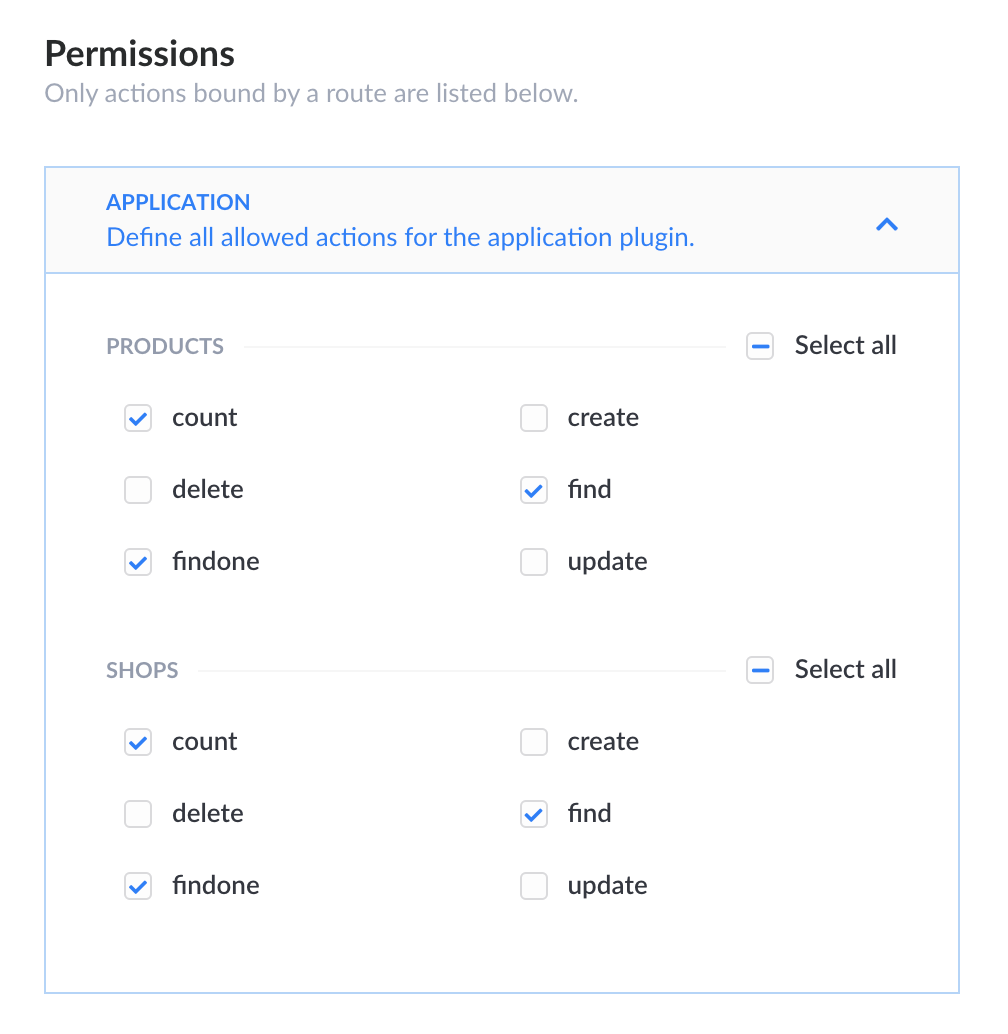
Then, under Settings > Users and permissions > Roles, select the Public role and make sure it can perform count, find and findone operations on both Products and Shops collections:
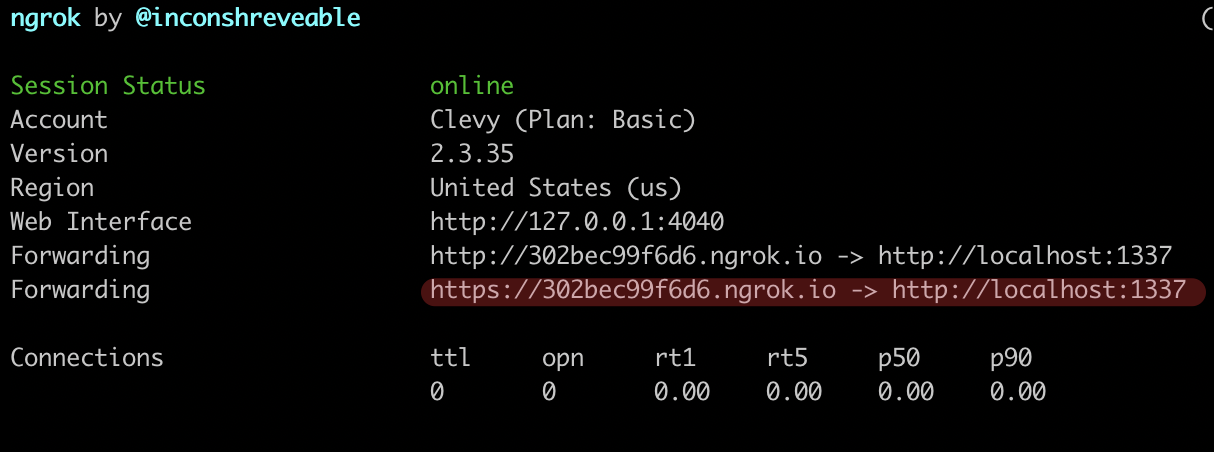
If you are hosting Strapi on your own machine, you also need to make the instance available to the internet. An easy way to do so is by using ngrok (only in during development!): ngrok http 1337 will create a new endpoint for your Strapi instance:
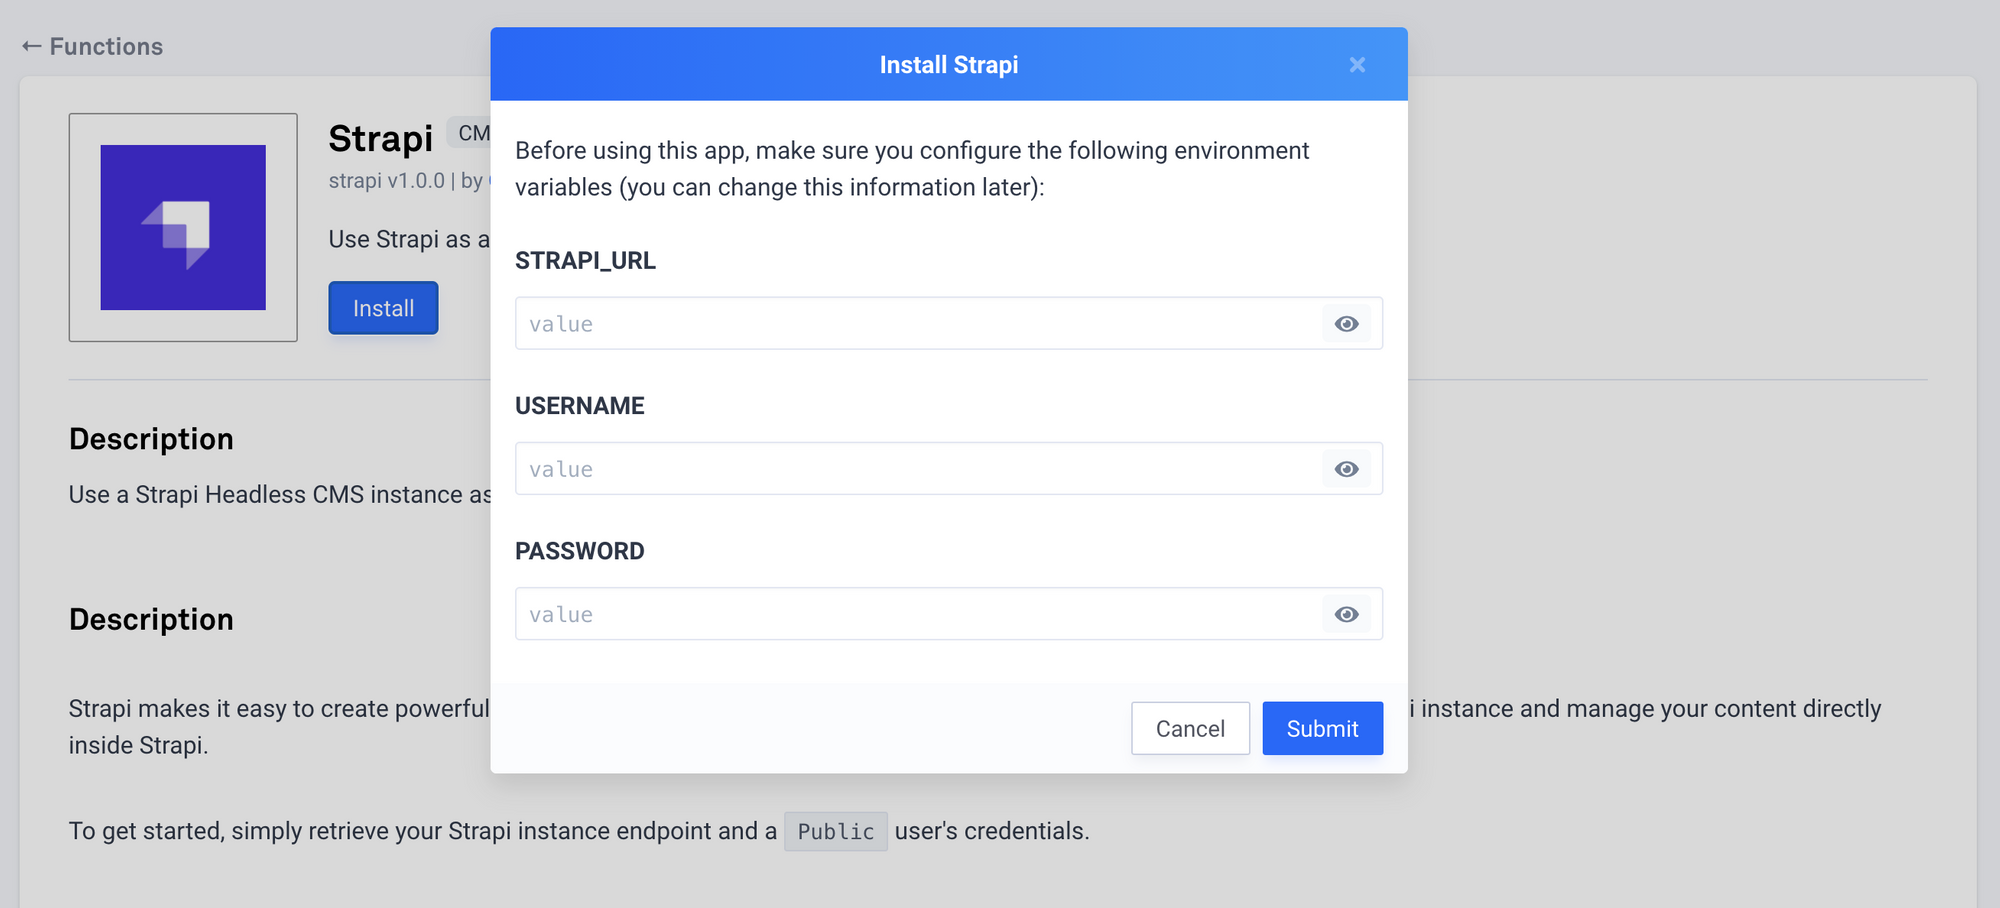
And finally, you also need to install the Strapi app in your CSML chatbot, and setting the Strapi endpoint and the username and password of your Public user in the configuration:
We are all set for now. Let's see how we can change our code to make our bot truly reusable and scalable!
Adapting the Code
Taking our code from earlier, we want to replace every variable with a dynamic value fetched from our API. Let's start with the introduction:
start:
  remember shop = Fn("strapi", endpoint="/shops?shopId=aaa")
  // this should return an array of matching shops, which should be a single shop as we are requesting only shopId aaa
  if (!shop.success || shop.data.length() != 1) {
  	say "Invalid shopId"
    goto end
  }

  // simplify data access
  remember shop = shop.data[0]

  say shop.greetingText
  say shop.openingHours
  say "Our address is: {{shop.address}}"
  goto services
Now, let's dynamically show the accepted products:
services:
  say shop.description

  do STRAPI_URL = YOUR_STRAPI_ENDPOINT // replace with your own value
  do cards = []
  do options = []
  foreach (product) in shop.products {
    do button = Button(
      product.name,
      productId=product.id,
      price=product.price,
      payload="PRODUCT:{{product.id}}",
    )
    do options.push(button)
    do cards.push(Card(
      product.name,
      image_url="{{STRAPI_URL}}{{product.coverImage.formats.medium.url}}",
      subtitle=product.description,
      buttons=[button]
    ))
  }

  say Carousel(cards)

  hold

  do selected = event.match_array(options)

  if (selected) {
    say "The cost for {{selected.title}} is ${{selected.price}}"
    remember productId = selected.productId
    goto end
  }

  say "I did not understand!"
  goto services
Let's explain what this code does. The best way to display products in a bot is by using a carousel. To generate the carousel, we need to iterate over the available products for each shop, which are part of the data returned by the call to the Strapi backend.
Each product will get its own card, and each card will have a single button allowing the user to select one of the options. The button also embeds some metadata for parsing it later on in the bot, for example the price and name of the item, or its ID.
Then, when a user clicks on a button, we match the value of the click with all the buttons and we make sure that it was one of the available options. Then we simply display the price and name of the product, and continue with our conversation. In this simple scenario, we just end the conversation there and then, but perhaps you would like to book a time for the intervention or get the user's phone number to give them a call later on. It's up to you!
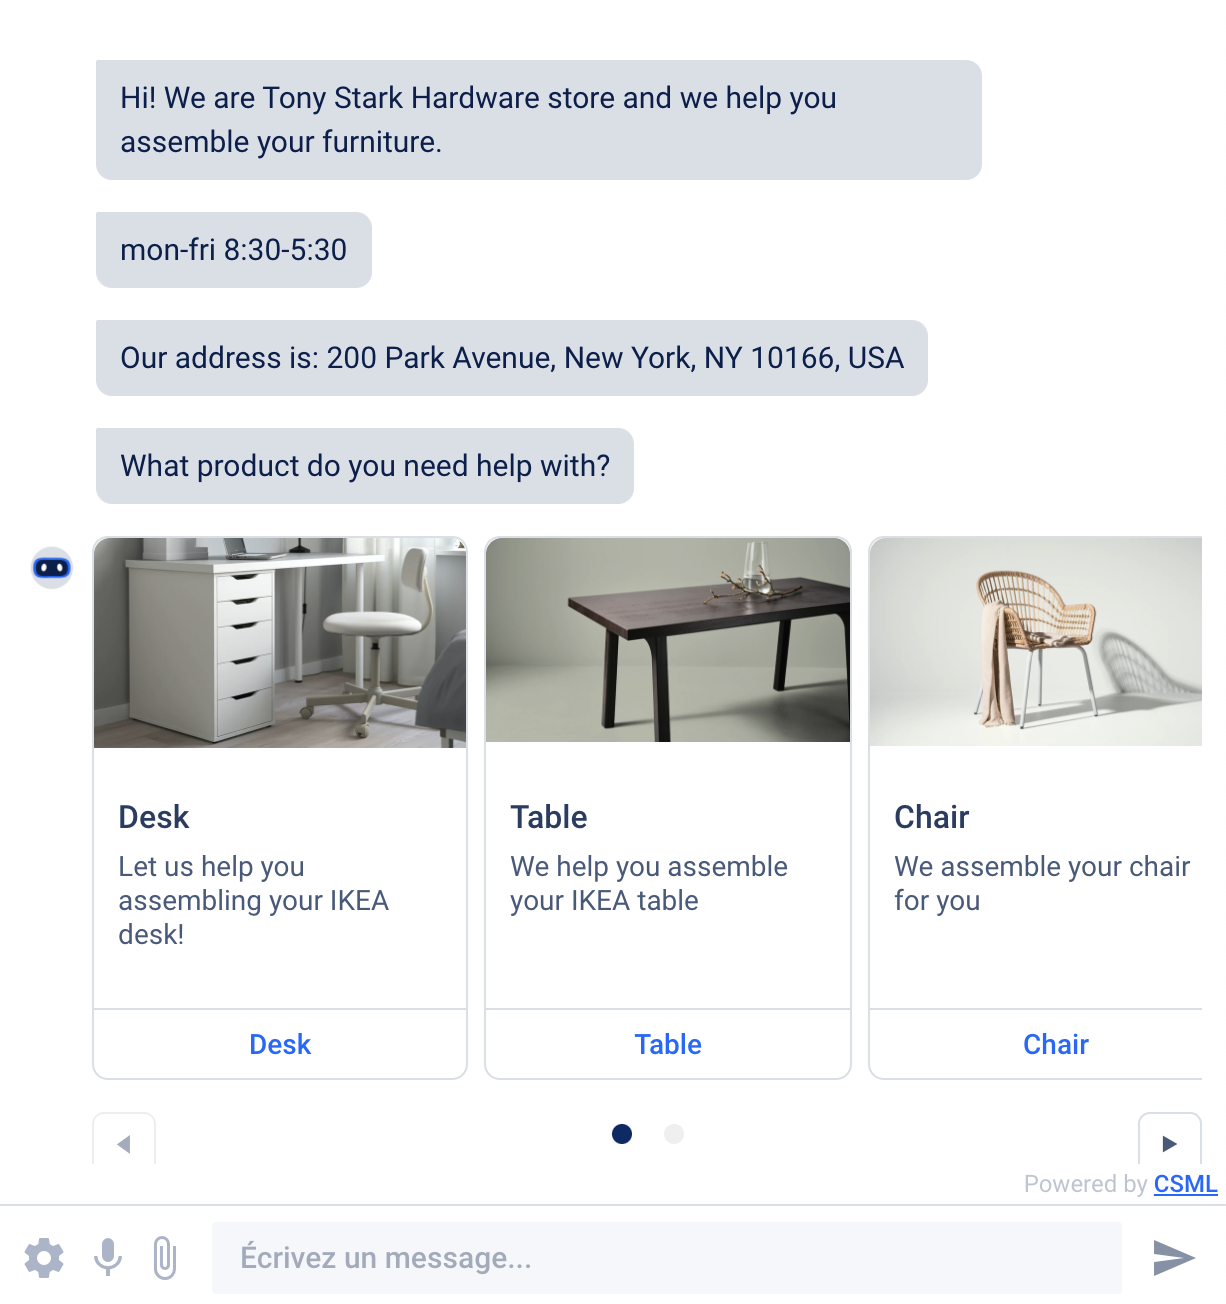
Here is the end result of our code:
Onboarding New Customers
Let's say that you have a new customer for your chatbot. Yay! Now it's just a case of adding a new shop in the Strapi backend, and giving it a unique ID and giving them a way to include the chatbot on their website so that their visitors can access their services through the chatbot.
So let's do this!
In CSML Studio, visit the Channels section, and create a new webapp channel, give it a suitable name and description for your customer. Now, scroll down to the bottom of that window and grab the chatbox script:
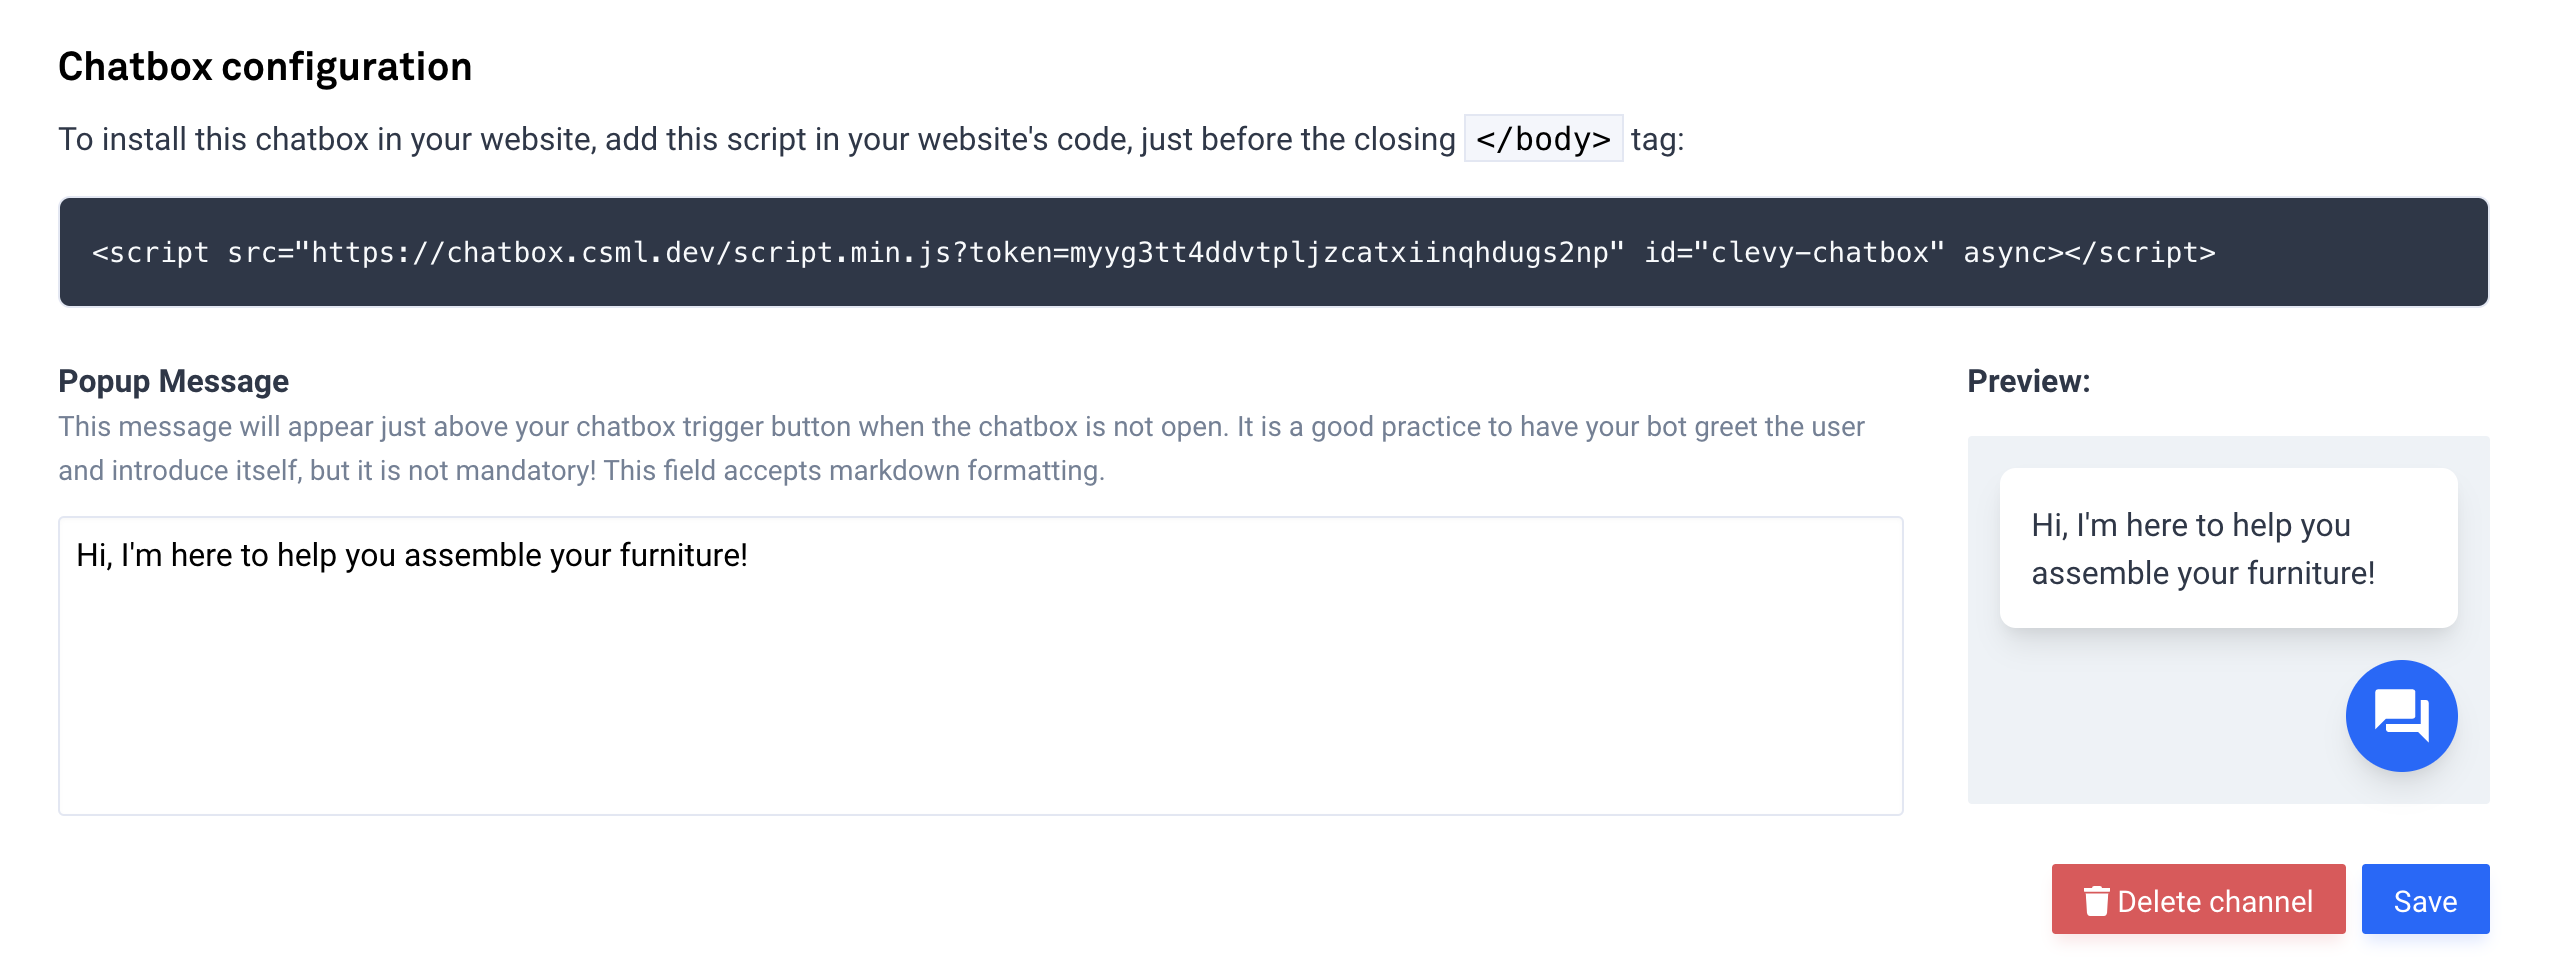
As shown in the documentation, you can easily add custom metadata to this script. For example, a shopId value! This will be injected into your conversation everytime a user visits the chatbot. You need to URL-encode the JSON value first (you can use this tool to do so).
input:   {"shopId":"aaa"}
output:  %7B%22shopId%22%3A%22aaa%22%7D
Your script should then look like this:
<script
  src="{CHATBOX_URL}"
  id="clevy-chatbox"
  data-webapp-metadata="%7B%22shopId%22%3A%22aaa%22%7D"
  async></script>
Now, when a user comes to use the chatbot, the _metadata.shopId value is available and should be set to "aaa".
Let's change our query to Strapi accordingly:
// perhaps add some error handling in case the script is misconfigured:
if (!_metadata.shopId) {
  say "Missing shopId!"
  goto end
}

// dynamically retrieve the shopId value from the metadata
remember shop = Fn("strapi", endpoint="/shops?shopId={{_metadata.shopId}}")
And voilà! You are definitely all set. Now your chatbot is fully dynamic and can react in real-time to changes in your database. You can add new customers or remove existing ones without ever touching the chatbot code, and if you need to change something in the chatbot, you don't need to replicate your changes across all your customers as they will all be updated instantly.
Conclusion
Obviously, this is just an oversimplified example. But it showcases an important pattern in development: how to refactor your code to make it more maintainable, scalable, and decoupled from your business needs so that you can grow your business without having to change your code too much.
Strapi is a great solution to very quickly create powerful, customisable application backends. And it works very well with chatbots too!